Of course I forgot my camera (2 times now!) as we were setting up the show this week. I also went to a cool letterpress artists printpalooza at the Kings Bookstore, with steamroller printing and everything, and of course did not have my camera with either. I think I need to strap it to me permanently or something.
I wanted to announce the reception for Spring Thing at the Grand Impromptu Gallery this friday March 6th from 5-8pm. We will also be open for the monthly art walk Thursday March 19th from 4-8pm.
I helped paint and hang some work this week. The show looks really nice, if you have a chance to stop by. We are featuring works from all the members, so there is a really nice variety of 2-d and 3-d pieces. I wont forget to take the camera with to the reception on friday and then I can finally post some photos.

Printmaker, Illustrator, Author. See what goes on behind the curtains...
Wednesday, March 4, 2009

Thursday, February 26, 2009
Grand Impromptu Gallery
.

I am so excited to have been selected to be a member of a co-op here in Tacoma. They are a pretty new gallery that started about a year ago. The space is awesome and is part of the Tacoma art walk every month. You can visit their site at http://www.grandimpromptugallery.com/. A new show is going up at the end of the week, titled Spring Fling, and I will already have work in it.
I am so happy to be a part of something new and exciting. I look forwards to being an active member and bringing something to the table there. Pictures to be posted soon!
Tuesday, February 17, 2009
Book on water and reflections
 I received a link for this nice book from the scientific illustration list serv. The book is from 1903, author Sir Montagu Pollock, title A Study of Reflexion and Colour in River, Lake and Sea. The book is old, but offers some intersting insights into the physical nature of reflections in water.
The database can also be searched with other keywords (woodcut, print, etching etc.) to find other old forgotten books and ilustrations. In addition to texts, you can also find audio, film and music files.
Thursday, February 12, 2009
PLU National Print Exhibition
.
 Above: Patrick Merrill, 4 Horsemen of the Apocalypse, woodcut, 1st prize; Robert Schwieger, Bob's Workshop, screenprint on glass.
 I had a chance to visit the closing reception of the Pacific Lutheran University National Print Exhibition on Friday Feb 11th. The wonderful exhibition, organized by master printer Craig Cornwall, was juried by Tacoma Art Museum curator Margaret Bullock.
Below left to right: Tom Baker, Beacon, relief, silkscreen; Karla Hackenmiller, Liminal Deploy, etching; Andrew Au, GLNrUD, etching, silkscreen, 2nd prize; Jenny Freestone, Vessel, Recycle, drypoint, etching.

 The exhibition was a joy to see offering such a wide variety of beautiful prints and combinations of techniques from established and up and coming artists alike. Ms Bullock said in her statement that her criteria for jurying pieces into the exhibition were well thought out compositions, mastery of the techniques, and intriguing combinations of materials and processes.

 Some of my favorite surprises were Robert Schwieger’s screen print on glass, Patrick Merrill’s large woodcut triptych (which also won first prize) and Kathleen O’Connell’s etching, drypoint and coffee print. Mr. Cornwall was also doing a printing demo with students during the reception for visitors to see how the intaglio process works.

 Above left to right: Kathleen O'Connell, Cities and Names: Cristobal, etching, drypoint, coffee; Chandler O'Leary, Versailles, letterpress; Ann Schuster, Collateral Damage, woodcut.
 Above: Patrick Merrill, 4 Horsemen of the Apocalypse, woodcut, 1st prize; Robert Schwieger, Bob's Workshop, screenprint on glass.
 I had a chance to visit the closing reception of the Pacific Lutheran University National Print Exhibition on Friday Feb 11th. The wonderful exhibition, organized by master printer Craig Cornwall, was juried by Tacoma Art Museum curator Margaret Bullock.
Below left to right: Tom Baker, Beacon, relief, silkscreen; Karla Hackenmiller, Liminal Deploy, etching; Andrew Au, GLNrUD, etching, silkscreen, 2nd prize; Jenny Freestone, Vessel, Recycle, drypoint, etching.
 The exhibition was a joy to see offering such a wide variety of beautiful prints and combinations of techniques from established and up and coming artists alike. Ms Bullock said in her statement that her criteria for jurying pieces into the exhibition were well thought out compositions, mastery of the techniques, and intriguing combinations of materials and processes.
 Some of my favorite surprises were Robert Schwieger’s screen print on glass, Patrick Merrill’s large woodcut triptych (which also won first prize) and Kathleen O’Connell’s etching, drypoint and coffee print. Mr. Cornwall was also doing a printing demo with students during the reception for visitors to see how the intaglio process works.
 Above left to right: Kathleen O'Connell, Cities and Names: Cristobal, etching, drypoint, coffee; Chandler O'Leary, Versailles, letterpress; Ann Schuster, Collateral Damage, woodcut.
Please enjoy some of the pictures from the exhibition.
.

Wednesday, February 4, 2009
Printmaking Quotes
I was on the road for a couple of days with our move, and I came to my computer to find over 90 messages (daily normal around 10)! The Mid America Print Council list serv had sent me tons of quotes about printmaking. Thank goodness Nichole Geary has collected them in her blog to share to the world. Here are some of my faves:
"Printmaking is fun because it takes a perfectly simple process like drawing and makes it as complicated and error prone as possible."
- George Bodmer submitted by Julian Cox
"Printmaking, like sex, is not solely about reproduction."
submitted by Curtis Readel, Christopher Cannon, and Jeremy Cody.
"If you can't do it in black and white, all the color in the world is not going to help."
- Robert Malone, Southern Illinois University at Edwardsville submitted by Amy Schmierbach
"Inspiration is for amateurs! The rest of us get to work!"
- Chuck Close, SGC Keynote Address, Boston, MA 2004 submitted by Syd Cross and Dusty Herbig
"The great thing about printmaking is that it brings the element of sport into artmaking."
- unknown submitted by Matt Rebholz
Nichole has a pretty cool blog otherwise too, worth checking it out! Thanks Nichole for putting this together.
"Printmaking is fun because it takes a perfectly simple process like drawing and makes it as complicated and error prone as possible."
- George Bodmer submitted by Julian Cox
"Printmaking, like sex, is not solely about reproduction."
submitted by Curtis Readel, Christopher Cannon, and Jeremy Cody.
"If you can't do it in black and white, all the color in the world is not going to help."
- Robert Malone, Southern Illinois University at Edwardsville submitted by Amy Schmierbach
"Inspiration is for amateurs! The rest of us get to work!"
- Chuck Close, SGC Keynote Address, Boston, MA 2004 submitted by Syd Cross and Dusty Herbig
"The great thing about printmaking is that it brings the element of sport into artmaking."
- unknown submitted by Matt Rebholz
Nichole has a pretty cool blog otherwise too, worth checking it out! Thanks Nichole for putting this together.
Monday, January 26, 2009
Movin' and shakin'

 Our movers will be here on wednesday! For all the hustle and bustle I won't be able to write in a little bit. It will be a long drive from GA to WA. Hopefully we'll get internet set up at our new house within a week or so when we arrive.
 I packed my sewing machines yesterday, so I concentrated on some printmaking for a change today. I did the demo on the lithography plates last week, and got inspired to make a set of three little "hut" prints. The images are only a couple of inches tall- I think they'll look nice in some shadow boxes.
While I was drawing the prints, I was thinking back to my childhood. Building little huts was one of my favorite activities growing up. Even when the other kids would come and break our hut down, we would always build a new one trying to make innovations as we scavenged for supplies.

Thursday, January 22, 2009
Z-Acryl Lithography Printing
I had a chance to demo z-acryl plates to a couple of the teachers at AASU and thought it would be the perfect opportunity to tape it and add it here. Z-acryl (brand name) makes thin plastic plates that are used similar to aluminum litho plates, but the advantage to these plates are their immediacy, cost and ease of use. There is no need to etch the images and the thin plates can be run through a computer lazer printer to print images on. When using toner, the plates do need to baked in the over according to the manufacturers directions to make sure that the toner does not lift off during printing. The plates are 13"x18" and currently cost $2.50 per plate. Something else similar to these plates are Pronto Plates, but I have not used them, so I cant say much about them. As far as I have heard they are preocessed the same way.
Basics before starting
1. be careful not to touch the front of the paper a lot. the oils in your fingers will stick to the paper, and will catch ink and print.
2. the paper has a front and a back side. The front is the rough side and the back is the glossy smooth side.
3. I am not aware of any way to make corrections for these plates, so what you draw there is permanent. (I'm not vouching for this, but you could maybe try scraping it off with a razor, but that would only work for very small areas.)
To start with my image, I already had a small leftover piece of a larger sheet. I wanted to just draw a small image that was fast and easy to print for the demo purpose. After I figure out my paper size, I place the litho paper face down on my CLEAN drawing surface and draw the outline of my paper on it with sharpie. (This will give you a pretty good registration, but I would not use it for multiple plate registration.) I also drew fainter lines in the middle to show where my image area is going to be. The paper is fairly translucent so the lines will show to the front.
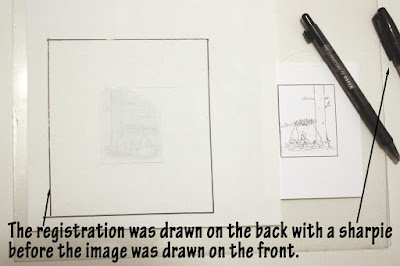
I figured out what I wanted to draw, and sketched it out on a separate piece of paper. After I flip the litho plate face up, and use the sketch underneath as a guide for my drawing (remember no corrections, so plan well). I use a piece of paper to keep my hand directly from touching the plate. Drawing materials can be virtually anything oil base and waterproof. Easy media to start off with are sharpie markers and ballpoint pens. I also had a student who drew his image on the back glossy side of the plate, and we was able to print if off from there as well. Some of his penmarks did come off in the process though.

Below you see the finished drawing executed with ballpoint pen. It has very fine lines which all printed beatifully. You can also see the registration marks showing from the backside of the paper. The drawing is now ready to be printed. Important: when you get ready to print, make sure you have time to print the whole edition all in one day. So far we have not had much luck reprinting the same plate the next day after it has dried in between. If anyone has a good solution to this I would love to hear it.
I took a video of me printing this drawing on the etching press at AASU. This is my first demo video that I ever made so bare with me... If you have anything to add, or questions please comment or leave me an email, and I will try to include all good advice.
Basics before starting
1. be careful not to touch the front of the paper a lot. the oils in your fingers will stick to the paper, and will catch ink and print.
2. the paper has a front and a back side. The front is the rough side and the back is the glossy smooth side.
3. I am not aware of any way to make corrections for these plates, so what you draw there is permanent. (I'm not vouching for this, but you could maybe try scraping it off with a razor, but that would only work for very small areas.)
To start with my image, I already had a small leftover piece of a larger sheet. I wanted to just draw a small image that was fast and easy to print for the demo purpose. After I figure out my paper size, I place the litho paper face down on my CLEAN drawing surface and draw the outline of my paper on it with sharpie. (This will give you a pretty good registration, but I would not use it for multiple plate registration.) I also drew fainter lines in the middle to show where my image area is going to be. The paper is fairly translucent so the lines will show to the front.


I figured out what I wanted to draw, and sketched it out on a separate piece of paper. After I flip the litho plate face up, and use the sketch underneath as a guide for my drawing (remember no corrections, so plan well). I use a piece of paper to keep my hand directly from touching the plate. Drawing materials can be virtually anything oil base and waterproof. Easy media to start off with are sharpie markers and ballpoint pens. I also had a student who drew his image on the back glossy side of the plate, and we was able to print if off from there as well. Some of his penmarks did come off in the process though.
Below you see the finished drawing executed with ballpoint pen. It has very fine lines which all printed beatifully. You can also see the registration marks showing from the backside of the paper.
 The drawing is now ready to be printed. Important: when you get ready to print, make sure you have time to print the whole edition all in one day. So far we have not had much luck reprinting the same plate the next day after it has dried in between. If anyone has a good solution to this I would love to hear it.
I took a video of me printing this drawing on the etching press at AASU. This is my first demo video that I ever made so bare with me... If you have anything to add, or questions please comment or leave me an email, and I will try to include all good advice.
Subscribe to:
Posts (Atom)