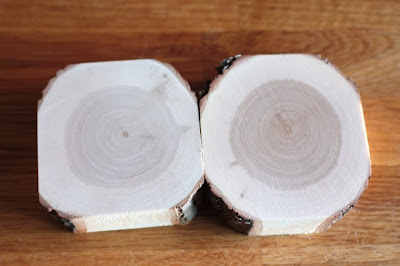
The prospect of getting some wood to carve on was exciting, but I felt pretty lost on how it would get from a wet branch in a field to a sanded block ready to carve in the studio. But since I'm never one to shun a challenge and learn something new, I convinced my dad to bring his chainsaw over the following weekend and help cut off some chunks I could refine. Ah- the retired look on my dads face: another one of her great ideas that will never get past the beginning. He was nice enough to humor me. It would have been great to take a whole bunch of wood to last for years, but since my parents weren't so keen on storing it for me and I can only fit so much in a suitcase I figured not to push my luck. And on the other hand I didn't even know if the woods would work for engraving and if I could get them to a state where they could be engraved. So at the end of a wet afternoon we ended up tossing a couple of small pieces of each type of tree in the trunk of the SUV...
 |
| Raita / Goat Willow |
The trees I got in finnish were Raita, Pihlaja and Omena. Raita is a type of a willow, Salix Caprea. I found three names for it in english: Goat Willow, Pussy Willow and Great Sallow. I am not an expert, so maybe one or all of them are correct.
 |
| Pihlaja / Rowan. Chopped with a chainsaw, you can see how irregular thickness the pieces are. |
The second tree, Pihlaja is in latin: Sorbus Aucuparia, and in english I found two names: Rowan and Mountain Ash.
 |
| Omena / Apple. Don't think these will be worth much carving into. |
The third tree was an old apple tree. This one had already fallen last year, and it had already begun to rot. I took a piece anyways to see if there was anything good with it, but at then end of sanding the wood, I don't think these pieces are worth carving. You can see the pits in it, since the wood was very crumbly. They do look beautiful in their colors if nothing else. Maybe I can paint on the surface on them or something.
After bringing the wood home, I had to figure out how to process it. The advice I got from woodengravers and found online was that drying the wood without a kiln would take months, if not years. As mentioned before, I have no place to put these damp pieces of wood, so they needed to be processes now. In the back of my mind the whole time, I had thought about a family friend we had 20 years ago, who made brooches and knife handles out of hardwood. He told us his little tip for drying wood was to microwave it. So online searching I went for microwave wood recipes.
I found several tidbits here and there mostly from woodturners, but I figured wood is wood and all I can lose is some time. In the end I think I ended up with a nice stack of discs ready to engrave for a couple days of work. Not a bad way to spend my summer "vacation".
First I used a chop saw and cut the woods up into discs about 1 inch or 2-3 cm thick. I did not measure too rigidly, since my proofing press has an adjustable height roller, and as a backup I have an etching press. The thing I was trying to be the most careful about was to cut each piece parallel, so one side is not thinner that the other. Easier said than done on a plain chop/chain saw, a lumpy piece of wood and the will to keep all my 10 fingers.
 |
| Detail of the apple tree. Notice the pits. The only really good part is on the right edge. |
After all the wood was cut, I sealed them in 1gal ziplock bags, to make sure they wouldn't dry out on me too quickly, since I was able to only process a small amount of wood once. One of the tips I found was that you could keep it in the freezer and open it once a week or every couple of days to dry the condensation out and return to the freezer. This allows for the wood to dry out slowly and without cracking, and prevents mold. But again, no time for this, I was returning back home in a week. I did try it with a couple of bags and condensation did appear in a matter of days, so I assume this technique would work.
So what followed for the next week was a microwave hogging operation/experiment that left the house smelling like an old woodshed (good or bad- I dont know?). All that was needed was:
Wood for drying (mine were cut to about 1" thickness)
Plastic bags
Newspaper
Micorwave
Patience
The willow and apple were smaller cuts, about 3in across, and the ash was bigger, around 5-8in across. For the smaller pieces I would microwave 40 seconds on high and the bigger pieces 1 min on high. You want to heat the wood up, so that I will lose moisture, but not too hot, where it will lose the moisture too fast and crack. The reason wood cracks when it dries is that the inside of the wood dries slower than the outside, and when the outside dries, it contracts around the middle and then cracks. The reason the microwaving works is that it dries the wood from the inside out. I also learned that the heart of the wood, when dry, contracts less than the more porous outside of the wood. But when dried right, it should all stay together without cracking.
After heating in the microwave, I would place the wood in between news papers. It keeps it warm longer and helps ease the moisture out. The directions said to keep out about 30 seconds and then reheat in the microwave. Never let the wood completely cool off in between and keep it at an even heat. I think also the size of the piece matters, smaller pieces cool off faster than bigger ones.
At the end of the day in all reality, with a toddler, horses, dogs, other adults and visitors and using the kitchen microwave, it was not plausible to keep up a 30 second interval schedule. In the beginning I tried, but got pretty much the same result if I forgot the wood in between microwaving and let it sit for over an hour in between heating times. I think its just important to keep it up in the beginning when you are losing more moisture, and when the wood is close to drying out, it does not matter as much anymore. When the newspaper got soaked, I would turn it over or use a new one.
In the beginning I was heating up pieces individually, but then started to do batches of 2-5 to speed up the process. I would microwave on top of each other and lay out in between the papers to dry, and then make sure to stack in a different order next time when microwaving.
How do you know when you are done microwaving the wood? One good telltale sign is to weigh in between microwaving to see if you are still losing weight, and when the weight loss becomes less, you are done. I used a digital kitchen scale. Here are some examples of weights and how many rounds of microwaving I did. (if there is a big jump, I probably forgot the wood for a while.)
5 small (3in) pieces of wood, all weight in grams: 614, 606, 560, 526, 500, 458, 440, 422,408, 400
1 small piece: 122, 116, 112, 108, 102, 96, 92, 88, 84, 82, 80, 78
2 big ones: 884, 866, 850, 840, 834, 828, 822, 794, 782, 766, 754, 740, 730, 722
I would also hold the wood to see how dry and light it felt. Each piece would lose about 1/3 of its weight. I did not want them to be parch dry, because I figured they would crack easier. The little moisture that was left was ok and what more needed to go would naturally evaporate over time without cracking the wood. (I've had the wood sitting in my studio for about 4 months now, and it's still not cracked. So I think it was a good decision.)
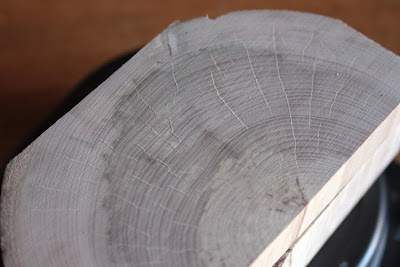
After all the wood was dried and piled up nicely on the dining room table, it was time to sand the discs. All we had was a belt sander and a pad sander. The belt sander had a 80 grit paper on it, and the pad sander a 180. Remember the pieces had been cut with a coarse blade with the chop saw, and the big pieces with a chainsaw, so there was a decent amount to sand down. I used a work bench where the wood pieces could be attached down and I would use the sander as evenly as possible to smooth the surface. For the smaller pieces, I would attach the beltsander belly up on the vice and then hold the pieces on it to sand them. The only thing I tried to do was to sand from all directions and make sure not to push down on the edges, so that the discs wouldn't end up dome shaped. After I got the surfaces smooth with the belt sander, I used the pad sander to refine them. If I would have found a belt that was a finer grit for the belt sander I would have only used that, but since we live in the country, I had to take what was available at the local store.
 |
| Hairline cracks in the rowan after too much sanding. |
The other tip is, if you don't have the best equipment, sand outside. There was so much wood dust that it caked the vice and stand I was using even with a little wind in the air. Being outside helped with not inhaling so much dust and having to clean up the whole shop after I was done. That was the process that worked for me. If you have any questions please ask.
Now there is a beautiful stack of wood waiting to be carved in my studio. I have a small piece of willow sitting next to my computer waiting for a sketch. I'll try to carve something to test and proof before we head out for Christmas and post the results. In the meantime: Happy Printing!
 |
| Oh the things that are waiting to be carved! |


